How can you plan a flawless wedding in Kenya? By using a detailed, complete wedding checklist.
This goes for any event, not just a wedding, because proper event planning requires a high level of detail and organization.
Plenty of small details can slip through the cracks and before you know it, one tiny seemingly inconsequential issue ruins everything.
In this article, we’ll show you how to create a complete wedding checklist to ensure you have a fantastic and memorable wedding.
Need a Wedding Planner? Hire Us
What is a wedding checklist?
It’s a list with everything you need to prepare and have ready for your wedding. The proper complete wedding checklist has columns for the specific item or action, the person overseeing it, the due date and the current status.
How to create a complete wedding checklist

It’s easy.
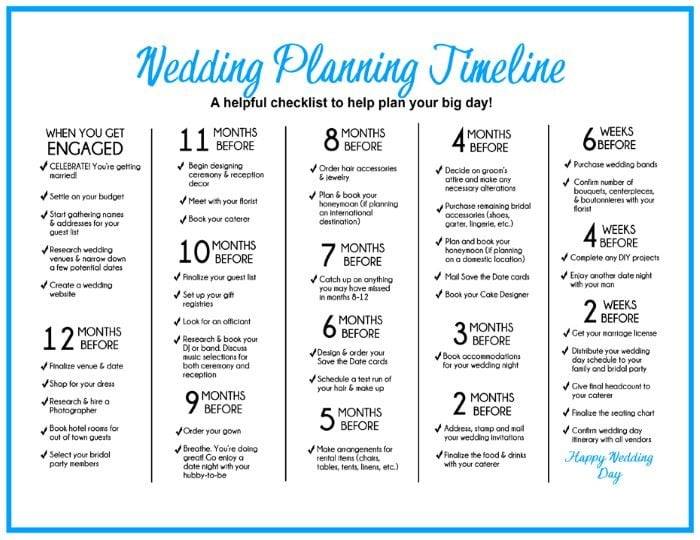
We recommend you start planning your wedding at least six to eight months before the big day.
Segment your complete wedding checklist into sections of eight months, five months, three months, one month and so on.
Then, populate it with the required content in the respective columns.
Eight months to the wedding

As soon as your spouse proposes, known or unknown to both of you, there’s a chain of events that’s naturally set off.
The traditional marriage process in Kenya is often the first thing to dispense with.
In Pwani, we have the Swahili Harusi, Kambas have Ndheo Ngasya, the Luo do the Nyombo, Kalenjins the Koito, and Kikuyus the Ruracio.
Step 1: Create an overview strategy of what you need and to include in your complete wedding checklist
- Research and create an approximate budget – for your engagement party, traditional wedding, church wedding and other requisite events like the bridal party dinner, honeymoon, etc.
- Discuss potential guests with your spouse and parents/guardians from both sides, then prepare a guest list for all the planned events.
- Decide on your bridal team because they’ll be with you through all these events. So, choose your best and most supportive cheerleaders.
- Create a mood board of your wedding attire, preferred colours and decor style/theme.
- Research vendors
The very first thing to do when planning your wedding is to research, discuss and agree with your spouse on a suitable budget that’s affordable and manageable for all the planned activities.
Secondly, your guest list will shape your entire event process so this should be the first thing to draw up as early as possible.
The guest list is traditionally a high-voltage pressure point for couples and their loved ones.
It’s a given that your guest list should prioritize close family, extended family, close friends and associates.
As a couple, discuss who needs to be at the wedding by order of priority and weigh in on your budget.
Step 2: List must-have vendors
Create an outline of the essentials which are the absolute must-haves for the wedding to happen. You and your spouse can create individual lists and then compare and merge them once you agree on the priorities.
Tier 1
- Photographer and videographer
- Officiant (s)
- Venue
- Wedding attire
- Wedding bands
- Cake
- Catering
- Transport
Tier 2
- Tables, tents, chairs and decor
- Catering
- Mc
- Audio Visual
- Invitations
Tier 3
- Cocktails
- Entertainment (Band or Artistes)
- Wedding beauty prep team
If you consider something to be complex, include it in the tier one section.
Step 3: Have a vision board
Create a vision board to articulate your plan and help you visualize it.
The vision board visually encompasses every detail and even captures your desire for the wedding’s look and feel.
Everything on your vision board should also be listed on the complete wedding checklist, have an actionable timeline and correspond to the overall budget.
The budget captures all the expected costs and keeps tabs on them to ensure you don’t exceed the planned expenses.
For your vision board, draw inspiration from the following:
- Select colour charts
- Swanky restaurants
- and Nature (yes)
Why Creating a Vision Board Eases your Planning Process
Step 3: Have a well-reasoned action plan to guide your complete wedding checklist
Remember the wedding checklist is just a guide; you need a well-reasoned action plan to drive the execution of everything that’s been laid out.
For instance, do you need one venue for everything, or do you need to split up the activities? What’s the justification for whatever action you take for each option?
You may decide to have the entire ceremony in one venue to save on logistics. Or, split up the venues for some reason; all these need to be rationalized in your action plan
Step 4: Consider engaging a wedding planner
Some brides, with the help of family and friends, can pull off the wedding planning process. But if that isn’t you, consider engaging a wedding planner.
They’ll help you streamline your plan, keep tabs on the wedding checklist, engage vendors and guide the process to deliver your desired outcome.
Step 5: Plan your traditional wedding
The traditional wedding process in Kenya precedes the church wedding.
It’s also at the traditional wedding, where you’ll receive clearance for the church wedding (that’s if you intend to have one).

However, don’t be stressed too much because most traditional wedding decor setups aren’t too elaborate, although times are changing, and we’ve seen some pretty contemporary setups.
The most important considerations for your traditional wedding are adherence to cultural expectations, the guest list, catering, and setup.
Step 6: Choose the wedding venue
After your traditional wedding, select and lock down the church wedding venue.
Choose your venue by drawing up a list of at least six top venues, then visit each space to vet its suitability for your special day.
Also, note the busy wedding seasons and weather forecasts for your date and match your select venue’s suitability to these.
Proven Steps to Choosing an Event Venue
Step 7: Source wedding attire
Apply the same technique as your search for the venue to your search for the most suitable wedding attire.
If you’re sourcing locally, work with a professional atelier or tailor who’s either been thoroughly vetted or has significant recent positive reviews.
One more thing: Give your bridal team creative license.
Everything doesn’t have to be matchy match or precisely as you’ve observed at another wedding.
Instead, create a distinct style that everyone can plug into and transform in their own way.
How to Get an Elegant Custom Made Wedding Gown in Kenya
Step 8: Discuss the honeymoon
This would be the best time to discuss your honeymoon.
Remember, during your budget planning in Step 1, you set aside a tentative budget for expected activities like the honeymoon.
Here you’re revisiting to firm up the plans, agree on the destination, date, and duration, make bookings, draw up packing lists and renew travel documents (if necessary).
Step 9: Plan a pre-wedding shoot
This will likely be your last photoshoot together as an unmarried couple, so make it as beautiful and memorable as possible.
Get the best photographer and brief them appropriately.
Invest in a theme, get outfits and choose a nice romantic venue.
The photos you take will be used for all your external communication, such as save-the-date invites, wedding invites, and wedding decor.
5 months to the wedding
Step 10: Agree and finalize your wedding style/theme/colours
Your wedding signature look rides on your chosen theme and colours, so the earlier you can settle on this, the better.
Your briefing pack to vendors should include a mood board from your vision board selection, colour chart, fabric samples (if possible) and some quirky details about your love journey.
Make it as exciting as possible to help your vendors actualize your vision as best as possible.
How to Select and Use the Best Colors for Your Wedding
Step 11: Have you finalised the guest list yet?
Next, refine your wedding guests list by building on the one you had at the traditional wedding process.
You probably catered for 50 – 100 guests, mainly close family from both sides and a few friends.
Now, your guest list is set to increase as you include acquaintances, if you choose, from work, church, school, and more.
There’s obviously a capped figure you’re working with, perhaps 200, 300 or even 600 max based on your approximated budget.
Step 12: Send out save-the-date invites
Once you’ve finalised the guest list, send out the save-the-date invites.
These invites are a courtesy to guests, reminding them of your upcoming nuptials and requesting them to save the date.
You can easily do fabulous e-invites with your pre-wedding photos and share them on email or WhatsApp.
3 months to the wedding
Step 13: Book the vendors
With the save-the-date invites already out, you’re well on your way to actualising your wedding!
So this is the best time to actively source and select your preferred vendors as listed in Step 2.
Your communication to vendors should confirm your expected guest numbers, including the briefing pack, the venue and the proposed budget. Once sent out, await their quotations to help you finalise.
Step 14: Set up quality control standards
One of the most frequently asked questions is how to ensure the quality of all the elements listed in the complete wedding checklist.
The easy way is to make your expectations known to the event planner and vendors from the start.
They must ensure you achieve your desires (within reason).
More importantly, you or the event planner will vet all elements personally, taking photos and ensuring the same is captured in vendor contracts.
Additionally, there’s no harm in requesting a sample of the playlist from the DJ, mock setups from the decorator (share the vision board with them, too), tastings from the caterer, and if you’re using grounds, keep a constant check nearer to the wedding to ensure the grass is well watered and maintained.
How to Find a Good DJ in Kenya : 6 Tips for Guaranteed Success (Expert Opinion)
If it rains (especially heavily), schedule a quick visit check the status, especially whether it floods.
As much as you have an event planner, it doesn’t mean you shouldn’t recheck stuff.
The rule of thumb here is to trust but verify.
Step 15: Finalize the attire.
Schedule your fittings to ensure your wedding dress and outfits are ready, even if only minor adjustments or alterations are required.
The earlier you do this, the better to avoid any disappointments with the style, design and fittings.
Once ready, have them dry-cleaned, pressed, packed and delivered to await the wedding day.
Step 16: Plan your wedding beauty prep
Source and select your glam team if you don’t already have a go-to person for your hair and beauty make-up requirements.
Wedding Beauty Prep: How to Feel and Look Good on Your Special Day
Kenyan Wedding Hairstyles for Your Special Day
Request recommendations from friends and family.
Browse the web or trawl through Instagram and TikTok for some good ones. You can engage your bridal team and make this one of the fun joint activities leading up to the wedding.
Once you’ve settled on one, call them and meet with them to agree on what’s best for you and your team based on your colours, style and theme.
Step 17: Buy the wedding bands
You’ve searched and settled on a jeweller, probably the one that supplied your engagement ring.
Choose the style of bands you want that suit your style and budget, do a fitting, and then ensure you order and pay for them in good time.
How to Choose the Best Engagement Ring in Kenya
Step 18: Book the officiant
Visit and inform your regular church pastor, priest or law chambers of your upcoming nuptials.
Or, ask family and friends for referrals to an officiant ordained to perform the ceremony.
Meet the officiant in person with your spouse to brief them about your big day and begin building a relationship as you build a good rapport.

One month before the wedding
Step 19: Organize a tasting with the caterer and baker
This meeting with your caterer and bake is probably one of your most essential tasks in the lead up to the wedding.
Discuss the menu in detail, and agree on suitable selections for starches, proteins and vegetables, desserts and drinks.
Remember to consider those with allergies, religious and dietary restrictions, plus children.
The Smart Guide to Planning for Food and Beverage at Your Wedding
Step 20: Plan a mock set-up with your decor vendor and florist
Don’t leave it to chance; meet with your decor and floral vendors to ensure they get all the elements right and confirm that the applications will be done to your expectations.
Here’s where you also have the opportunity to enforce Step 14 by reiterating your expectations.
Step 21: Send out wedding invites
From your interactions with your bridal team, family and friends, you pretty much have an idea of how many guests to expect.
Ensure you communicate this to your caterer, baker and furniture rental vendors.
Then, send out the wedding and rehearsal invitations to give your guests ample time to organize their schedules.
Step 22: Apply for the marriage certificate
You can get married in three legal ways here in Kenya: customary traditional, religious or civil.
Either way, you must apply for a marriage certificate.
Apply by giving a written notice 21 days in advance to the marriage registrar at the AG chambers.
There’s a process and cost to it and documentation to attach.
Step 23: Keep tabs on RSVPs
As the wedding date nears, aim to keep tabs on the expected number of guests, as this is one of the sure ways to blow up your budget.
Enlist a helper, such as a sibling or cousin, to follow up and update you once weekly until the last day.
The feedback should also be shared with your caterer and furniture vendor for easy planning.
Step 24: Choose menu cards and table numbers
If your budget allows, it’s advisable to design or commission menu cards.
It shows consideration for your guests since they’ll know what’s available and what to order in advance, with no surprises.
Include tidbits on meal options, main ingredients and some poetry that resonates with the two of you.
Table numbers help to guide guests, especially during food serving when the MC guides them by calling out table numbers.
Step 25: Signing off vendor contracts
Ensure you sign contracts with all your vendors.
The contract should clearly describe your and their expectations.
Signing contracts formalizes the relationship, giving it the seriousness it deserves.
Best part? Contracts help mitigate any risks from these relationships, holding everybody accountable for their deliverables and ensuring everyone gets the agreed compensation.
Two weeks before the wedding
Step 26: Follow up on RSVPs
Not everyone will RSVP.
However, those who do and those you follow up will indicate the numbers to expect.
To protect your numbers and for security reasons, request guests to RSVP or carry their invites to show at the entrance on the day.
Step 27: Write your vows
Make this count!
Take time to pen a poem about what you love about your spouse, your hopes for the future and your promise to realize this future.
Practice in front of the mirror if you want to memorize, or carry some handy notes if you can’t.
Step 28: Plan the church ceremony and reception program
Help your guests immerse themselves into your special day by creating a program of the planned proceedings for the day.
Besides the general briefing pack you shared to immerse them in your vision, the photographer and videographer need separate briefings on the people and settings they must capture.
The wedding program is handy for guests unfamiliar with your cultural or religious practices.
Step 29: Brief the photographer, videographer, MC and DJ
The value of this briefing can’t be emphasized.
These four vendors are critical to the success of your wedding.
The MC needs your guidance on sensitivities to be aware of, details about your family setups to speak about, any changes to the program and much more.
The DJ already has the playlist but must coordinate with the MC to ensure they deliver a fantastic experience.
One week before the wedding
Step 30: Host a brunch or luncheon for your bridal team
A brunch or luncheon is optional, BUT we recommend it.
Your bridal squad has been with you through the ups and downs of the planning process, maybe even over a year since the engagement.
Setting aside a day to reminisce about the entire period prepares everyone for a remarkable finale.
You can use this event to present them with special handy gift packs as proof of your appreciation.
Step 31: Rehearsals
This is also optional, especially if no children are in your lineup.
It’s also a personal decision since there are logistical implications.
Our advice is to have your bridal team visit the venue to familiarise themselves and visualise the day.
Step 32: Re-check RSVPs, budget status and all outstanding payments
It’s crunch time.
At least three days before the wedding, review the guest numbers and sort out any due amounts as required.
This is also the best time to review each complete wedding checklist line item in detail. Rope in your planner, maid of honour and one more person for this.
All said and done, I hope these steps give you an idea of what to include and how to segment content in your complete wedding checklist.
What to do if you want a different experience, not the usual
If you want a simple uncomplicated wedding, perhaps consider an elopement.
There’s a concept that’s taken root over the past couple of years–elopement weddings.
Traditionally, this type of wedding was construed to mean that the couple had taken off to marry in a bid to defy a particular tradition or expectation.
Not so today because an elopement wedding is essentially opting to have an unconventional, intimate wedding with just yourselves or a tiny circle in a location of your choice within your preferred budget.
It can be in your living room, a friend’s house, an office, a top a hill, mountain or the tallest building or on a river.

You can opt to have it anywhere you please as long as it’s legal and you have the means.
With an elopement wedding, you can ditch the headache of intricate planning because, the people likely to be present are you, your spouse, the minister, the photographer or the videographer and perhaps a few guests.
You don’t have to follow the traditional format of cake cutting, seating charts or anything you don’t like from the regular wedding format. You can customize to what you want, absolutely.
But you’ll still need a complete wedding checklist to ensure you don’t miss out a thing.
Not surprisingly, this format widely appeals to couples that either don’t want to incur exorbitant outrageous debt, want a fully customized experience or want a uniquely luxurious adventure.
Frequently asked questions
1. What is the checklist for a wedding?
A wedding checklist is a detailed breakdown of each task to be accomplished. It captures all details from venue sourcing, decor, entertainment, and catering to every minute detail you can imagine. A practical checklist is detailed, precise and clear to everyone at each stage of the planning process. It is a tracker to ensure everything is attended to and nothing falls off.
2. How do you plan a wedding step by step?
If it falls on you to plan your wedding, the first thing to do is sketch a wedding budget. Base your budget on critical elements like your gown, groom’s and wedding party attire. Then, settle on a guest list to determine necessary expenses like the venue, decor, catering, photography, entertainment. Next, book the officiant and legal documents. Don’t forget to include grooming for yourself, the groom and the wedding party.
3. What is the shortest time you can plan a wedding?
It depends on how much time you need to issue and confirm invitations. Usually, they’re sent about a month to a wedding. This also depends on how quickly you can create a conclusive guest list. Depending on the number of guests, it can often take about three weeks, at most four. So, with all these factors in mind, it’s best to give yourself about two to three months.
Consider our Affordable Wedding Planning Packages
Work with us for your wedding planning needs
If you’d like help with your wedding planning, we’re event and wedding planners in Nairobi Kenya.
Our offering comes with;
- valuable insights and guidance: As your event planner, we should help you navigate complex details and situations and help you emerge in one piece. We’ll guide you on budgeting, venue and vendor selection, and contracts.
- experience: We do this daily, so event planning is second nature. We’ve garnered knowledge of the best event seasons, elements, venues, and suppliers to ensure your success.
- industry networks: Over the years, we’ve built and continue to build robust working relationships with diverse suppliers and partners to enhance our offering.
Ready to start planning your special day? Contact us today, we’ll revert ASAP.


